SAML SSO
Notion provides Single Sign-On (SSO) functionality for Business and Enterprise customers to access the app through a single authentication source. This allows IT administrators to better manage team access and keeps information more secure 🔐
Jump to FAQs
Note: This feature is only available for users on the Business plan or Enterprise plan.
With SSO, you can streamline user management across systems, and remove the need for end-users to remember and manage multiple passwords by allowing them to sign in at one single access point and enjoy a seamless experience across multiple applications.
To use SSO with Notion:
Your workspace must be on a Business plan or Enterprise plan.
Your Identity Provider (IdP) must support the SAML 2.0 standard. See instructions for Identity Provider setup for specific apps here →
A workspace owner must configure SAML SSO for the Notion workspace.
At least one domain must be verified by a workspace owner. Learn more about domain verification →
Note: Only workspace members can use SAML SSO to log in. Guests invited to pages in a SAML-enabled Notion workspace can’t log in with SAML SSO. Instead, they’ll need to use another login method, like their username and password or login with Google or Apple.
Business plan
To set up SAML SSO for a Business workspace, a workspace owner can:
Go to
Settings→General.In the
Allowed email domainssection, remove all email domains.Select the
Identitytab inSettings.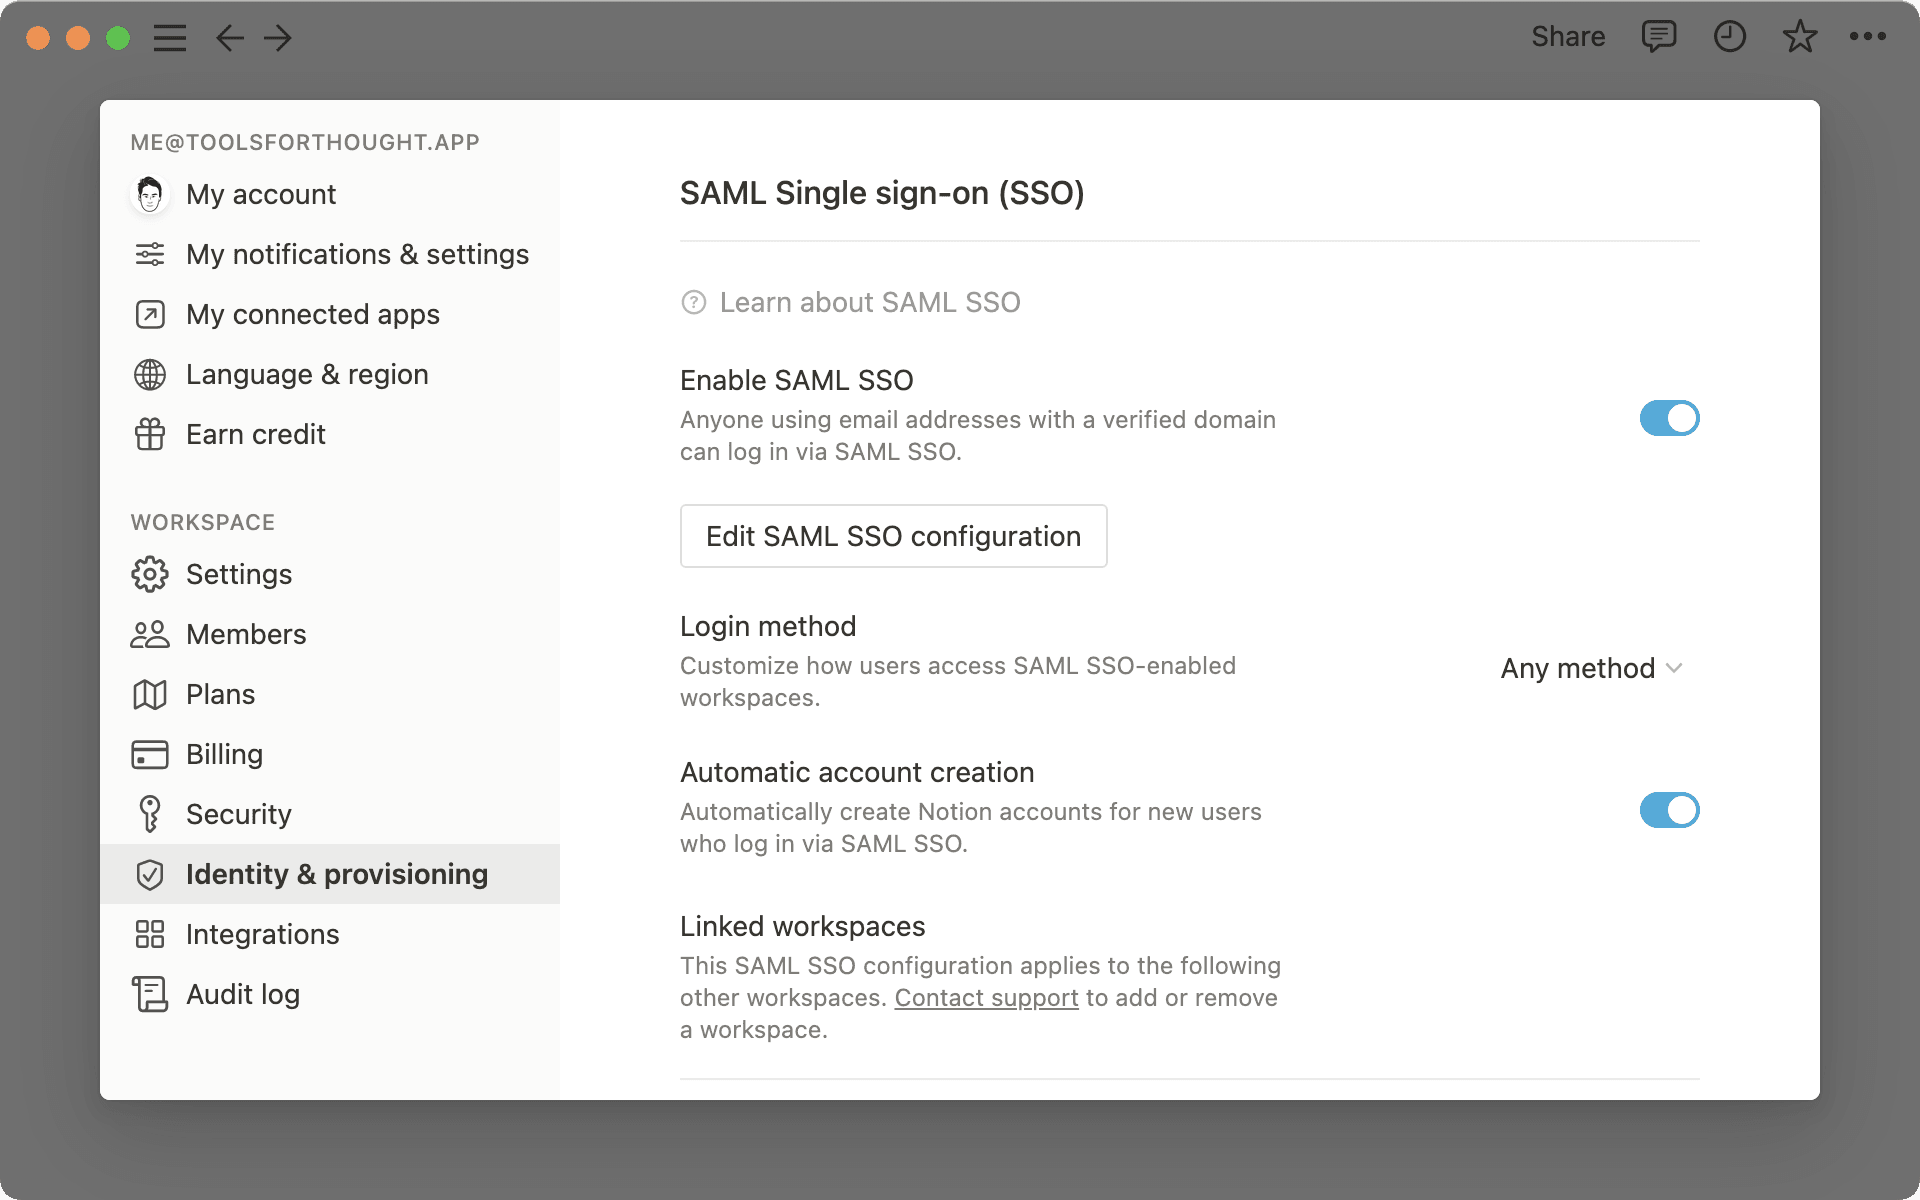
Verify one or more domains. See instructions for domain verification here →
Toggle on
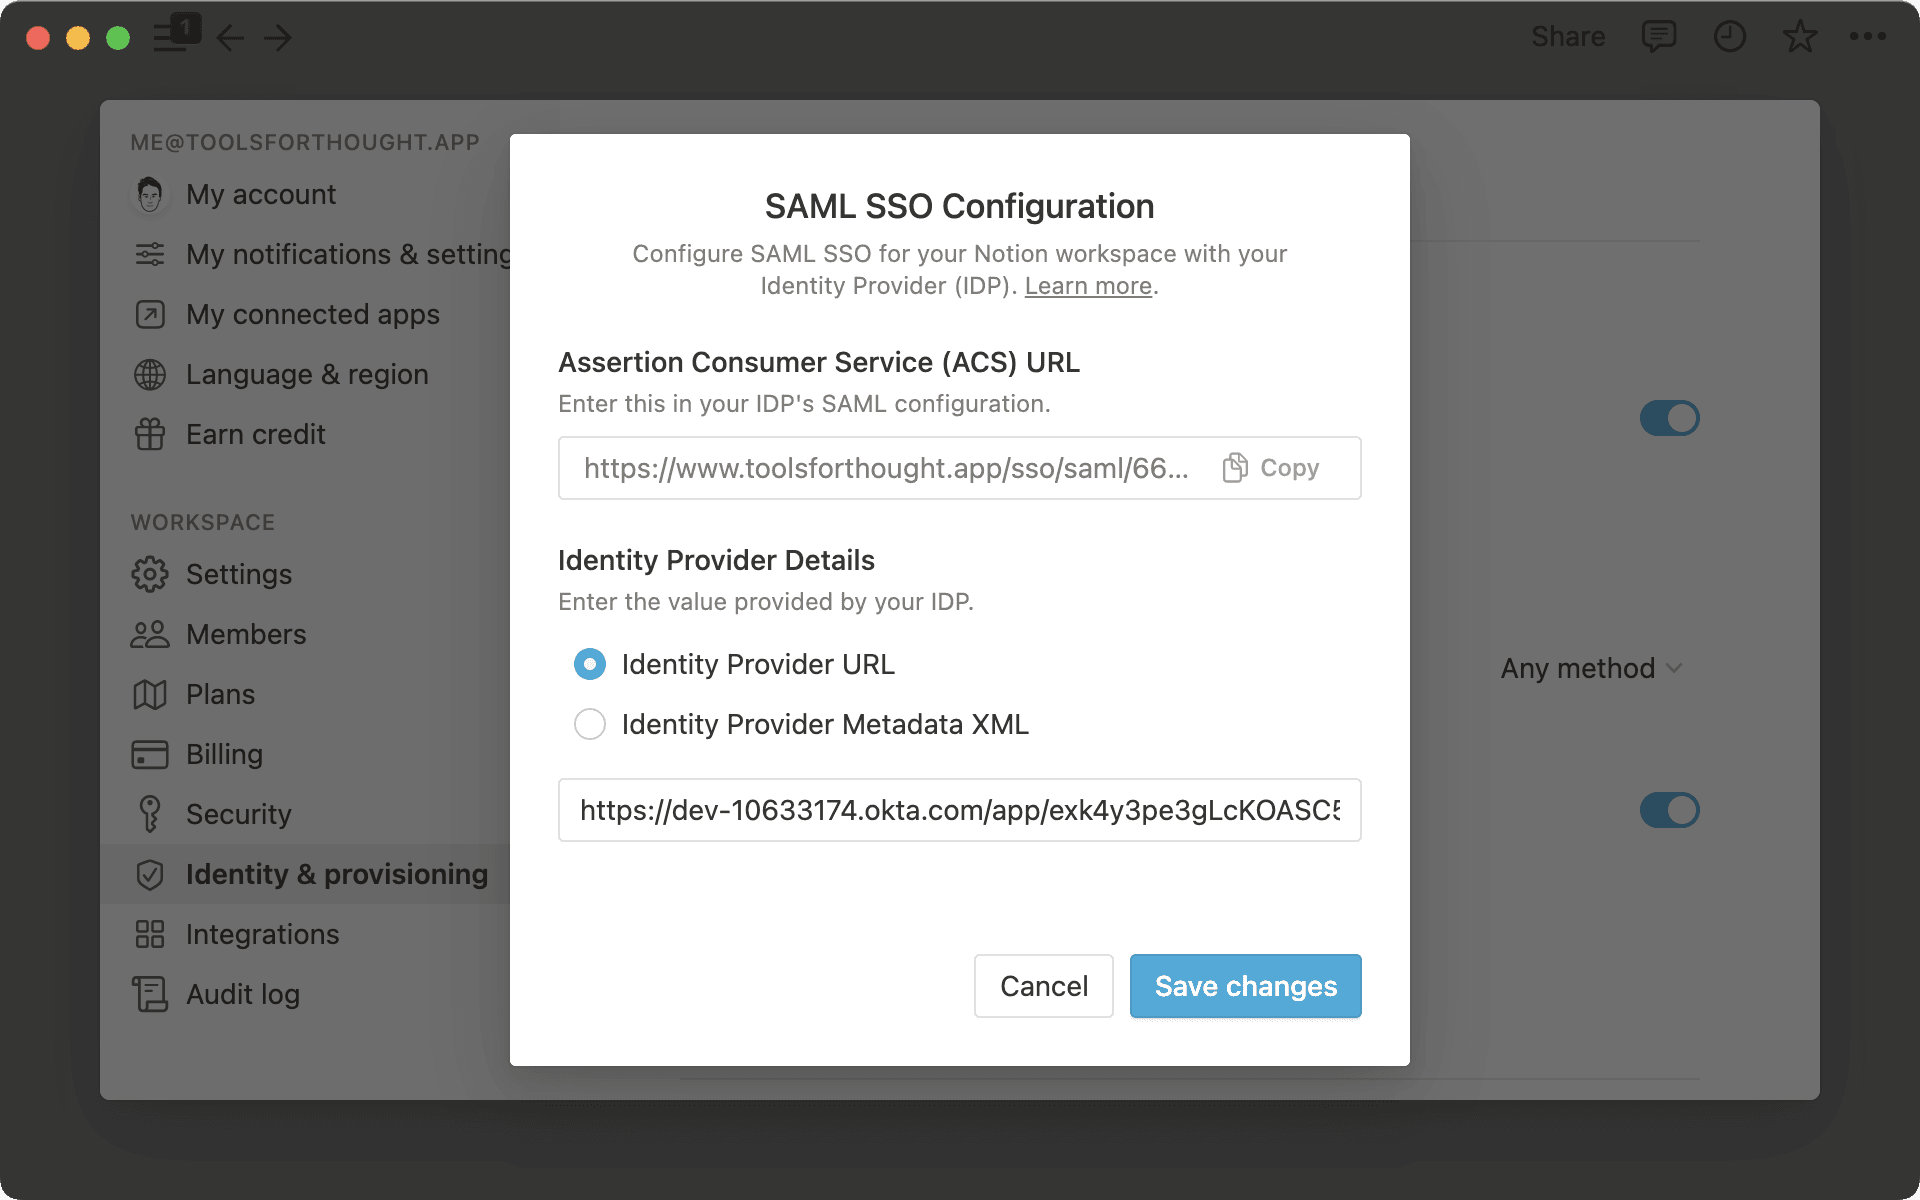
Enable SAML SSOand the SAML SSO Configuration modal will automatically appear and prompt you to complete the set-up.The SAML SSO Configuration modal is divided into two parts:
The
Assertion Consumer Service (ACS) URLneeds to be entered in your Identity Provider (IdP) portal.The
Identity Provider Detailsis a field in which you need to provide either an IdP URL or IdP metadata XML.
Enterprise plan
Enterprise plan organisation owners can manage SAML SSO for their workspace (or multiple workspaces belonging to their organisation) by following these steps:
Open the workspace switcher and select Manage organisation. You may need to Set up organisation first if you haven’t already. Learn more here →
In the
Generaltab of your organisation settings, toggle onEnable SAML SSO.Choose a setup method (URL or metadata XML), paste the required information from your Identity Provider or IdP, and select
Save & enable.
Note: At this time, organizations on the Enterprise Plan can only set up SAML SSO with one IdP.
Once you have completed your configuration of SAML SSO for a workspace, members will be able to log in via SAML SSO in addition to other login methods, like username and password or Google authentication.
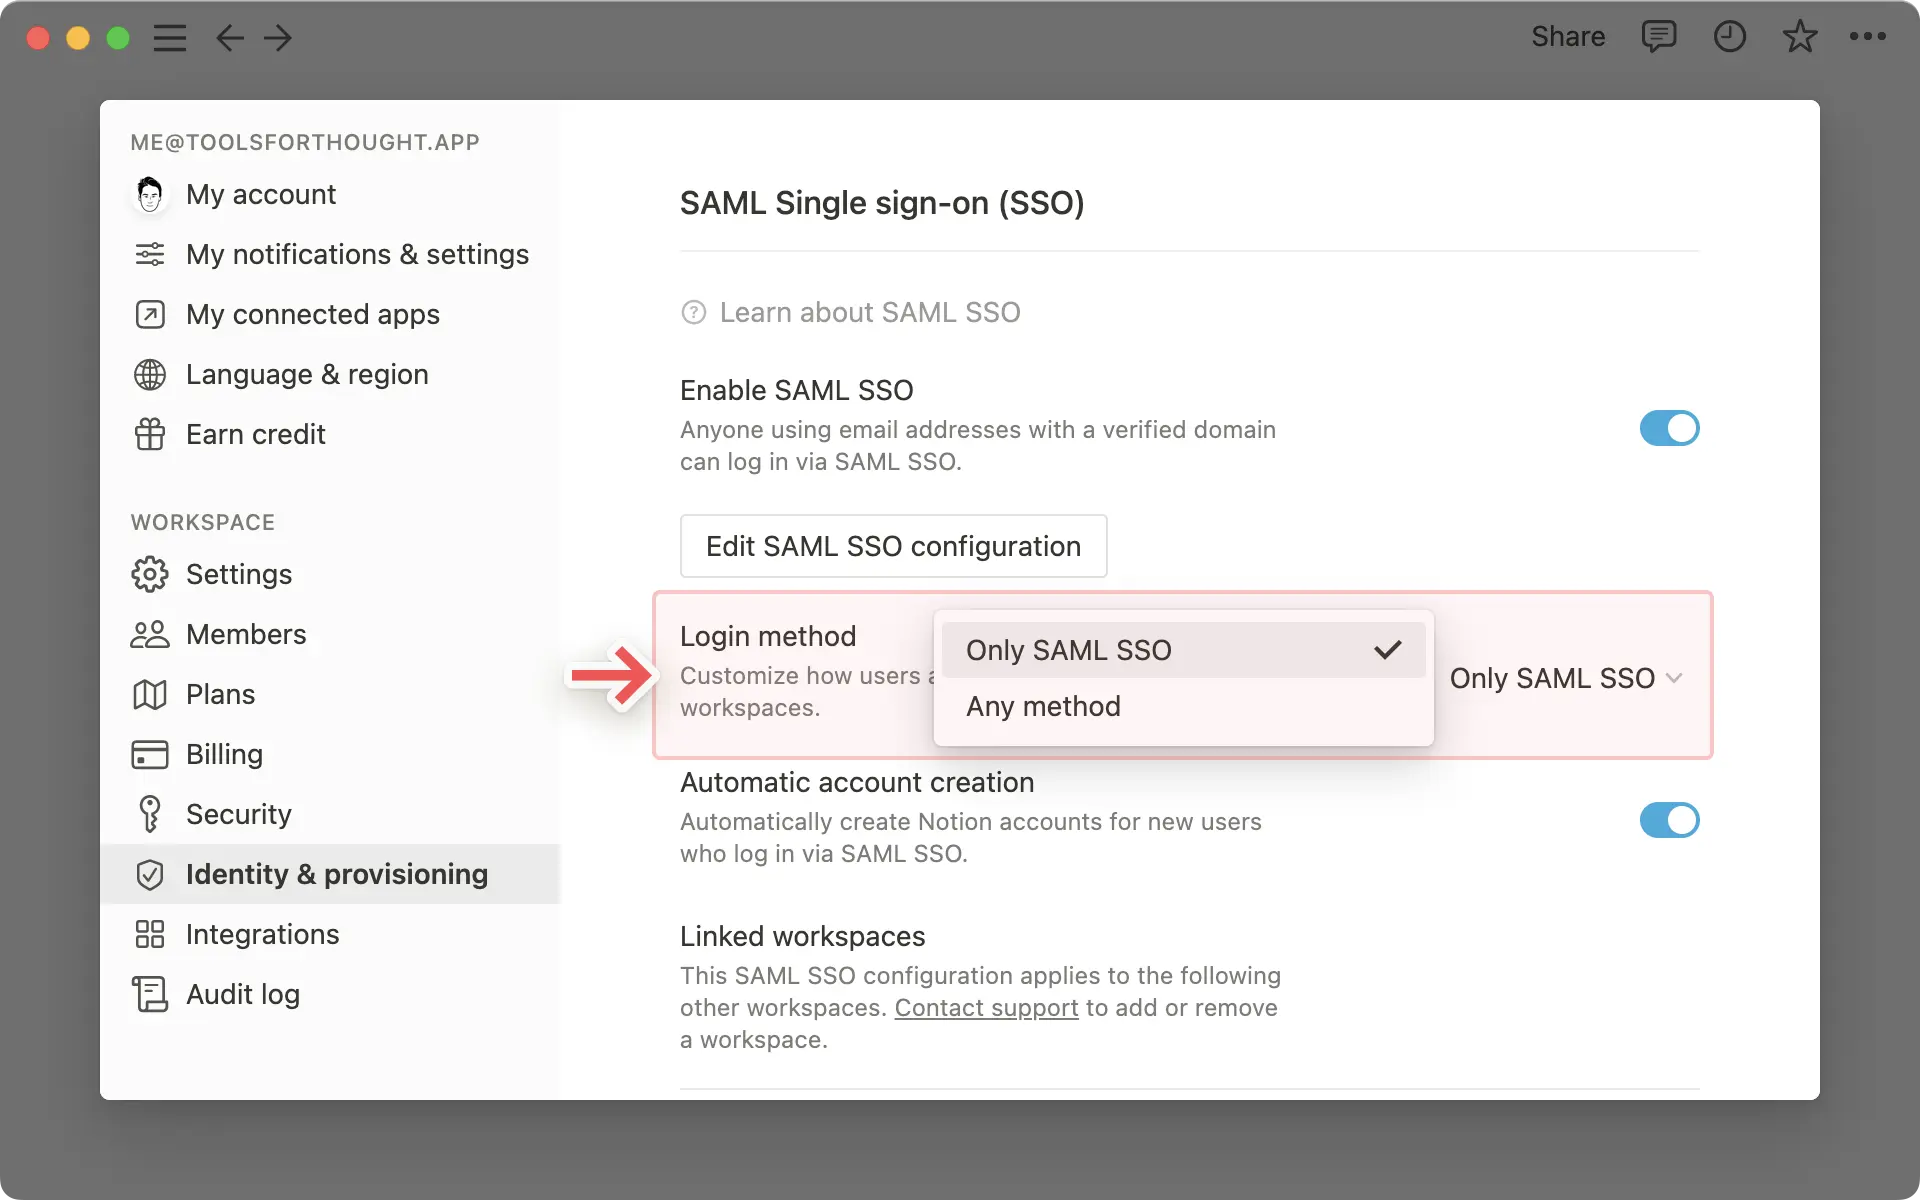
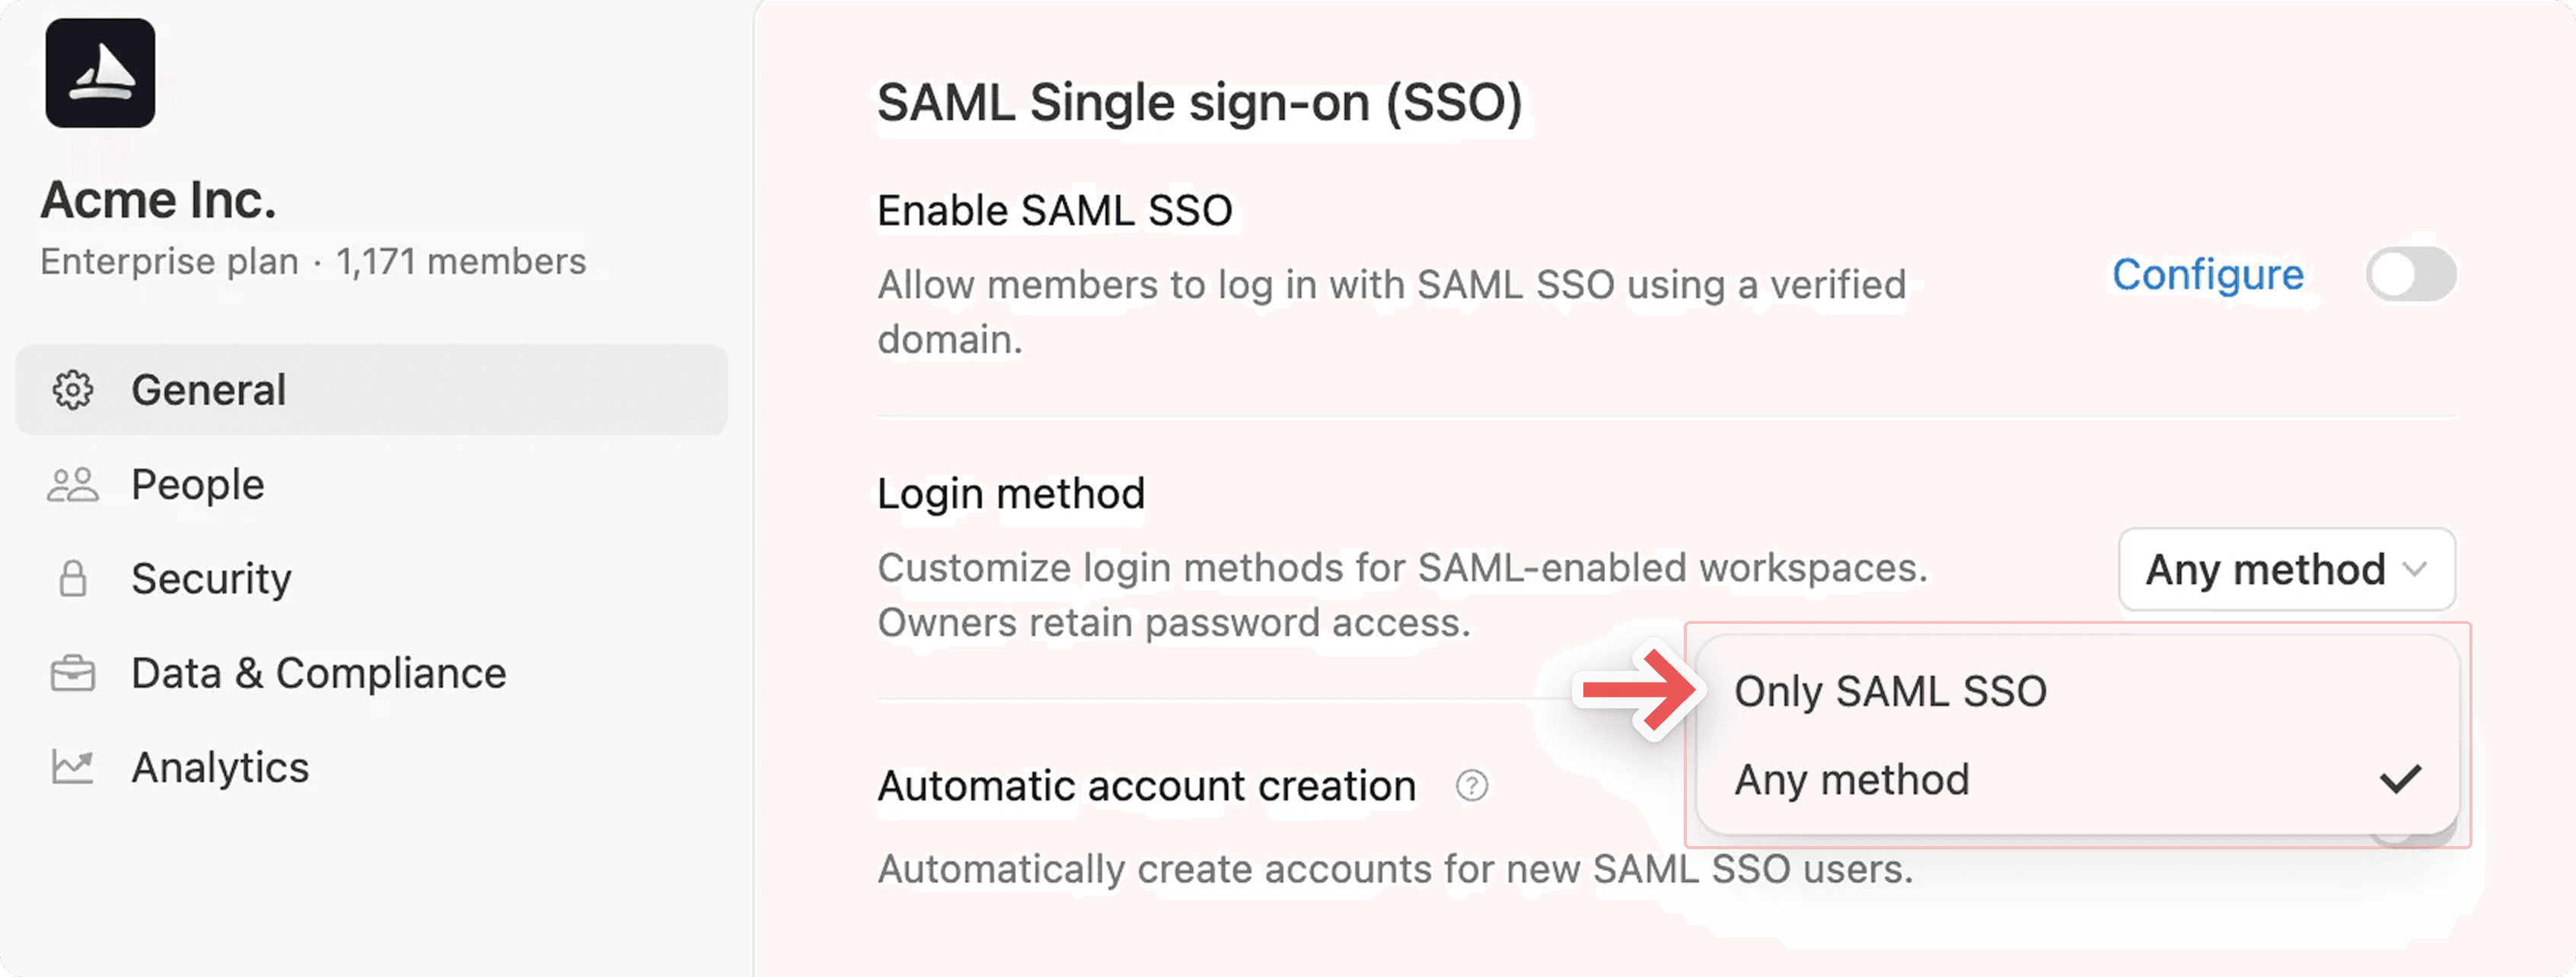
If you want to ensure that members can log in using only SAML SSO and no other method, go to your SAML SSO settings and update the Login method to Only SAML SSO. Once this happens, workspace users will be logged out and required to log back in using SAML SSO. SAML SSO will only be enforced for members who use your verified domain.
On the Business plan, this will look like this:
On the Enterprise plan, this will look like this:
SSO bypass
In the event of IdP or SAML failure, certain users will be able to bypass SAML SSO by using their email and password credentials. They’ll be able to log in and disable or update their configuration.
If a SAML configuration is managed at the organisation level, only organisation owners will be able to bypass SSO.
If a SAML configuration is managed at the workspace level, only workspace owners will be able to bypass SSO.
Note: This feature is only available to users on the Enterprise Plan. Domain verification is not required to enable this feature.
Workspace-level SAML authorisation allows enterprises to require SAML SSO for workspace access, regardless of a user's email domain. This enables safer external collaboration in your workspace.
To enable workspace-level SAML authorisation:
Open the workspace switcher and select
Manage organisation. You may need toSet up organisationfirst if you haven’t already. Learn more here →In the
Generaltab of your organisation settings, toggle onRequire SAML authorisation for workspace access.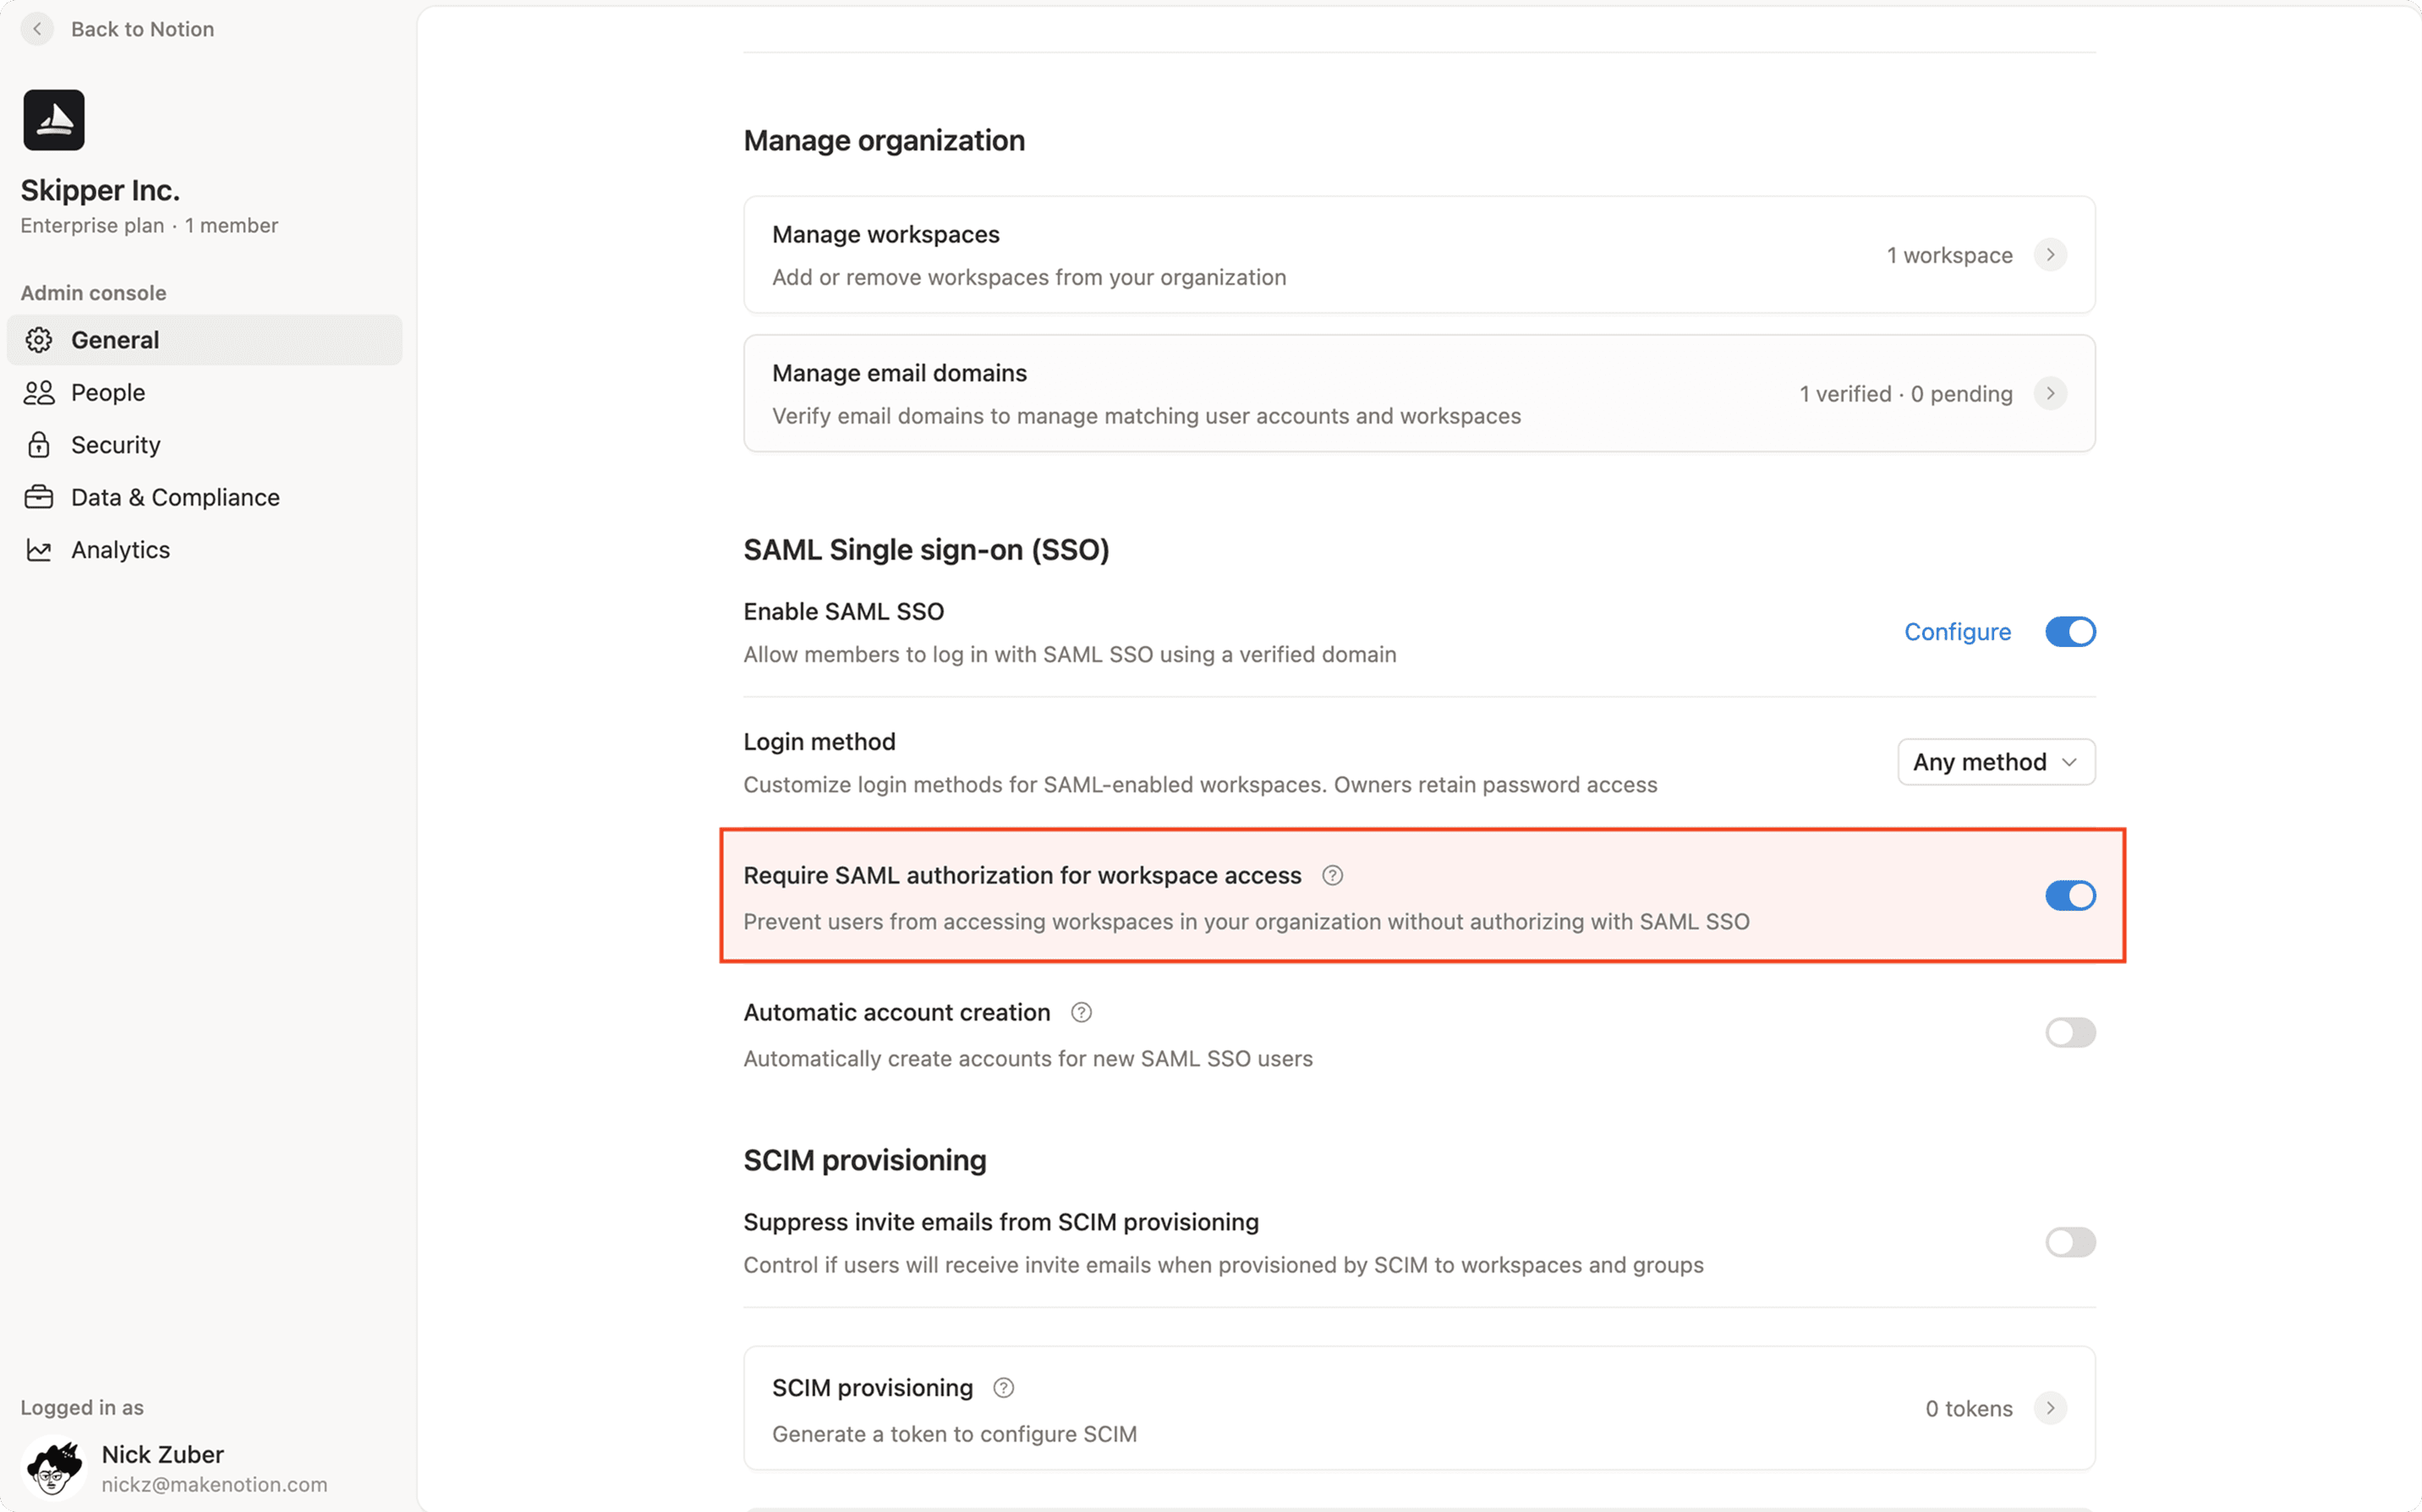
Note: Before enabling, ensure all members are added to your Identity Provider (IdP) to prevent accidental lockouts from the workspace.
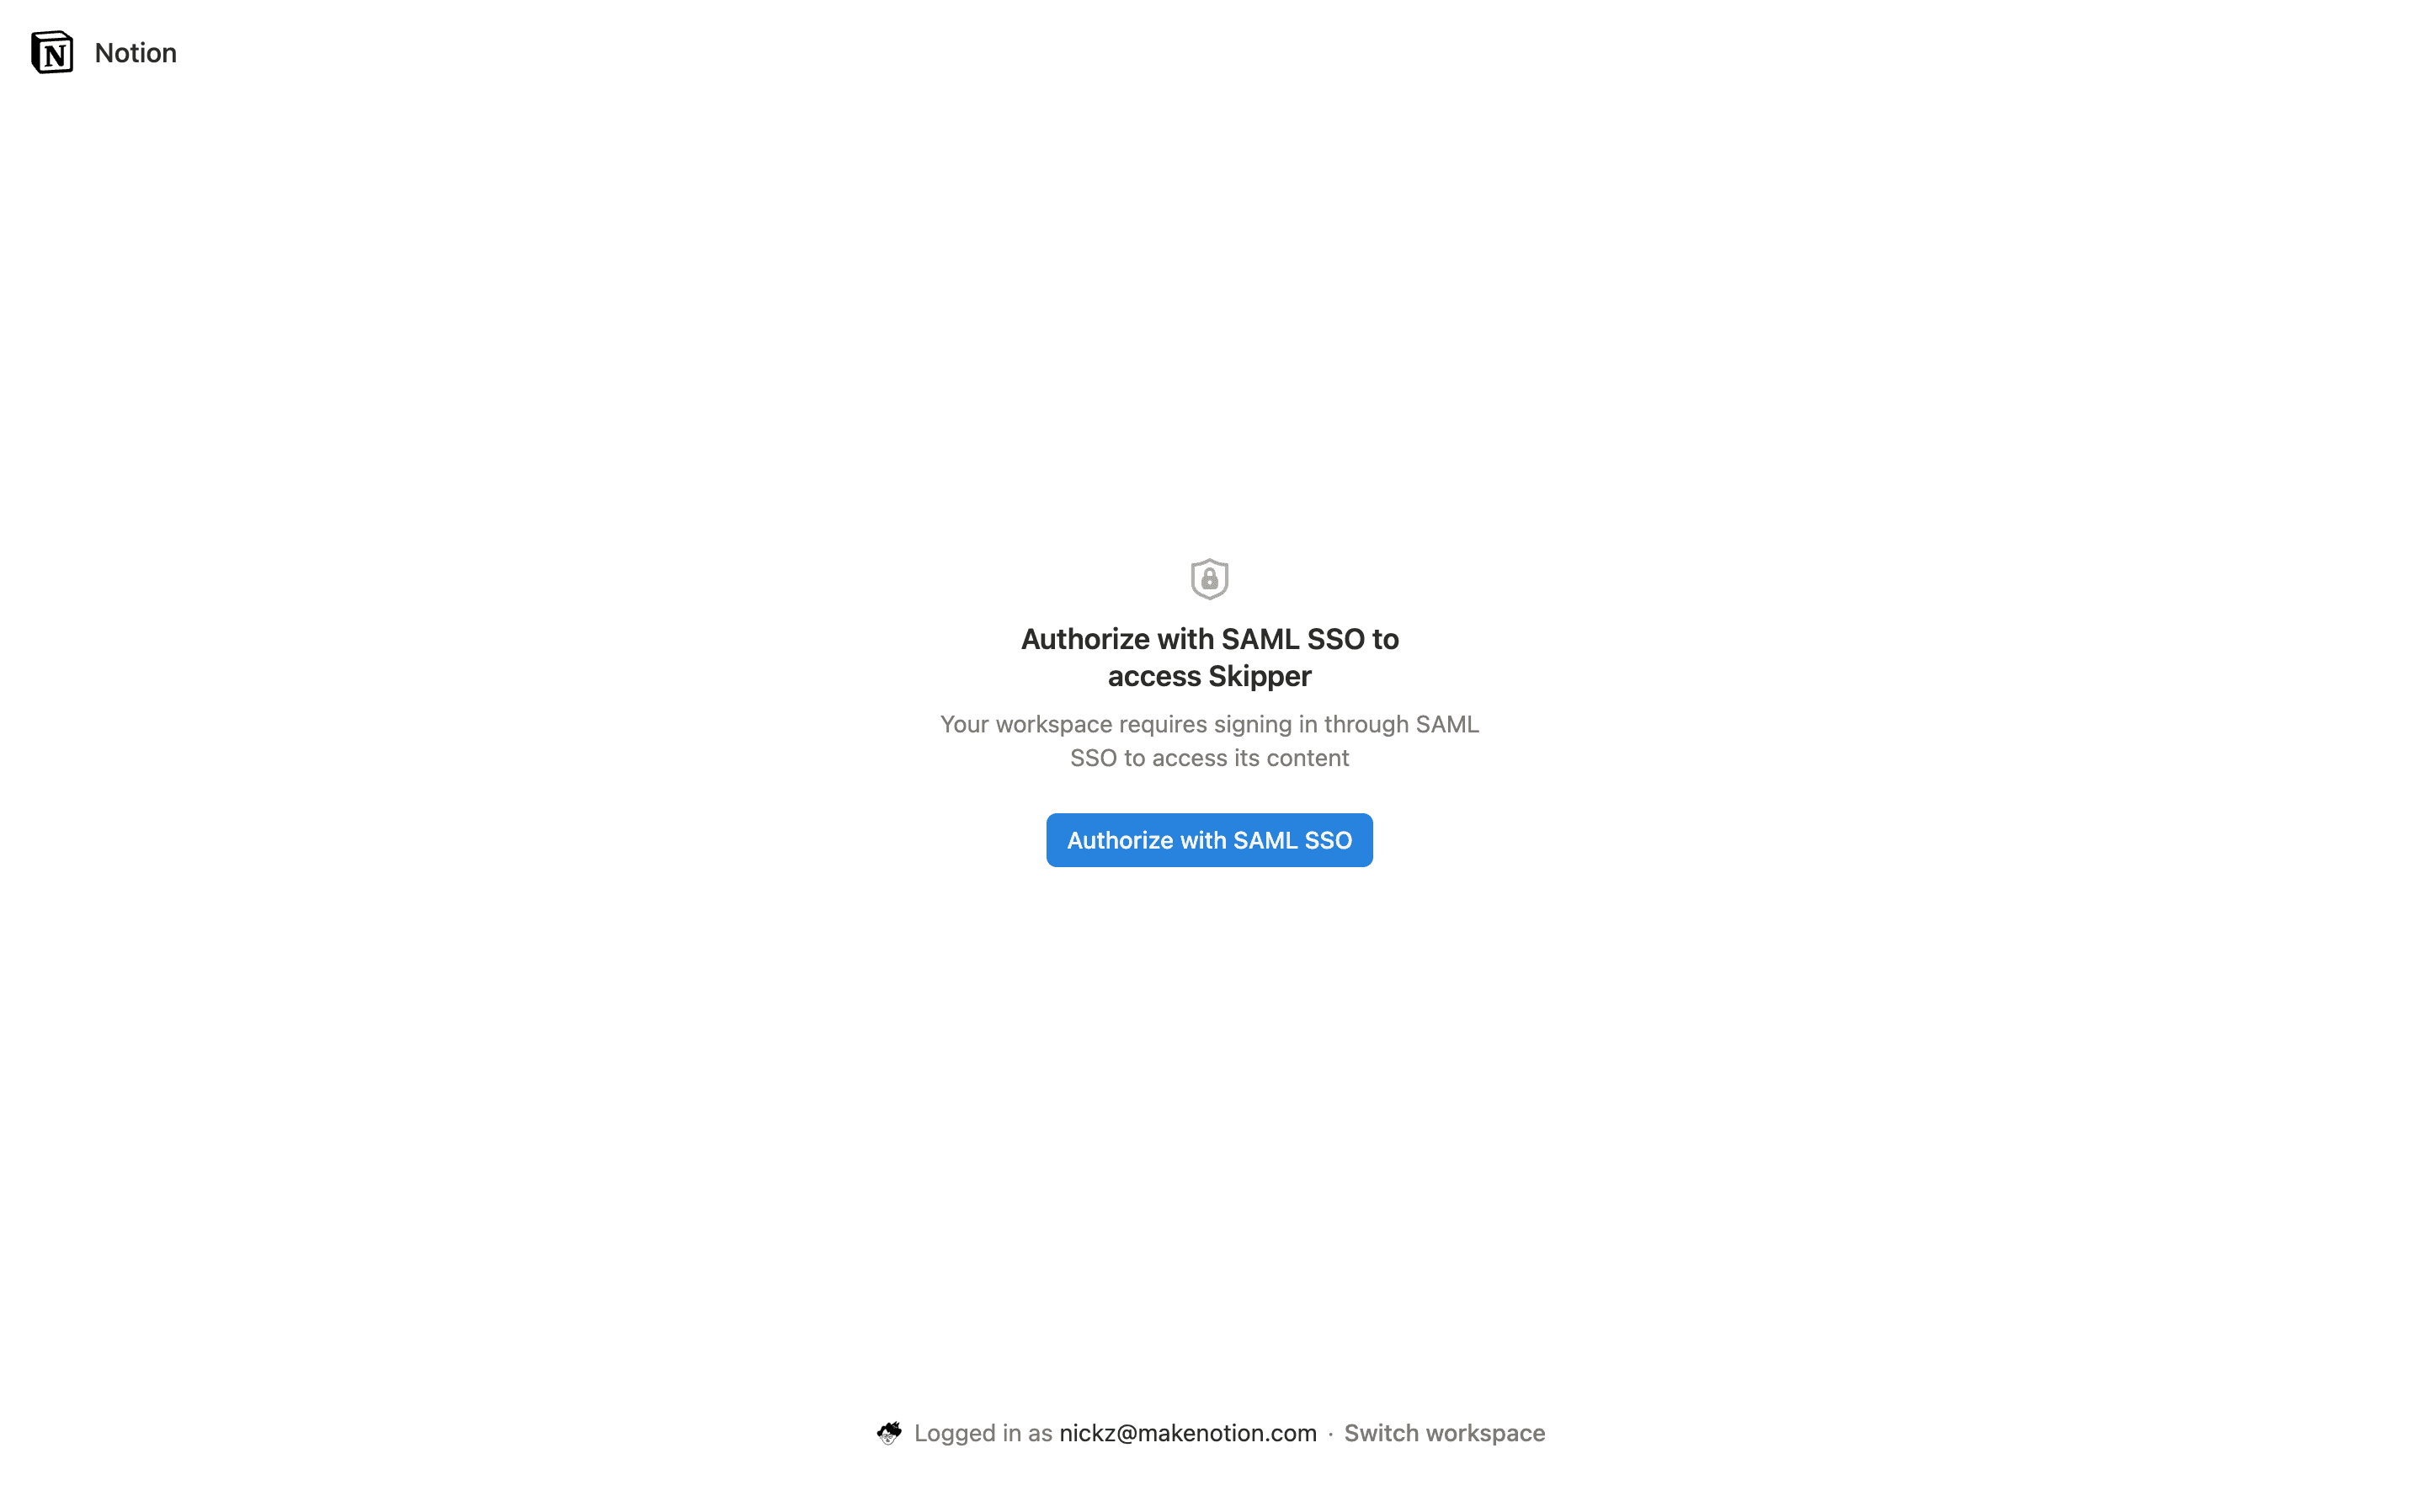
When enabled, members of the affected workspaces who haven’t already authorised with your organisation’s IdP will be met with an additional authorisation screen. They’ll need to go through SAML SSO to continue viewing your organisation’s workspaces.
Notion supports Just-in-Time provisioning when using SAML SSO. This allows someone signing in via SAML SSO to join the workspace automatically as a member.
To enable Just-in-Time provisioning if you're on the Business plan, go to Settings→Identity and make sure that Automatic account creation is enabled.
To enable Just-in-Time provisioning if you’re on the Enterprise plan, go to your organisation console → General and make sure that Automatic account creation is enabled.
Note: We don’t recommend enabling Just-in Time provisioning if you are using SCIM. Having an “allowed email domain” in place allows users on that domain to join the workspace so there could be a mismatch between membership in their Identity Providers and Notion.

FAQs
Why can't I enable SAML SSO?
Why can't I enable SAML SSO?
The most common reason is that you have not yet verified ownership of a domain. If this is the case, you'll notice that you either don’t have any domains listed in the verify email domain section or the domain is pending verification.
Why can’t I edit my SAML SSO settings?
Why can’t I edit my SAML SSO settings?
It's possible you're trying to modify the verified domains or SSO configuration from a linked workspace that's already associated with another SSO configuration.
In linked workspaces, all domain management and SSO configuration settings are read-only. To modify the SSO configuration or remove this workspace from the SSO configuration, you must have access to the primary workspace. The name of the primary workspace can be found at the top of the Identity & Provisioningtab in your settings.
Why do I need to verify a domain to enable SSO?
Why do I need to verify a domain to enable SSO?
We ask that the email domain ownership is validated to ensure that only the owner of the domain can customize how their users log into Notion.
I'm having trouble setting up SSO.
I'm having trouble setting up SSO.
Try using a URL instead of an XML.
Test the setup process with a test account before enforcing it for users.
If neither of these options help, reach out to support at
Why should I remove email domains from the “Allowed Email Domains” setting before configuring SAML SSO for my workspace?
Why should I remove email domains from the “Allowed Email Domains” setting before configuring SAML SSO for my workspace?
The Allowed Email Domain setting allows users with the selected domains to access your workspace without being provisioned via your IdP. To ensure that only users provisioned via your IdP can access your SAML-enabled workspace, disable this feature by removing all email addresses from the Allowed Email Domain list.
Can I still log in to Notion if my Identity Provider (IdP) is out of service?
Can I still log in to Notion if my Identity Provider (IdP) is out of service?
Yes, even with SAML enforced, workspace owners have the option to log in with email. A workspace owner can change the SAML configuration to disable Enforce SAML so users can log in with email again.
How do I allow admins of other workspaces in my SAML configuration to create new workspaces?
How do I allow admins of other workspaces in my SAML configuration to create new workspaces?
Only the admins of your primary workspace will be able to create new workspaces using your verified domain(s). Please reach out to our support team ([email protected]) to switch your primary SAML workspace to another linked workspace in your SAML configuration.