Automatically generate blocks, pages and more with the click of a button
Create content, add pages, edit database entries and more using buttons. Buttons can speed up repetitive tasks, streamline your workflow and help you do several things at once.
Maybe you spend a lot of time creating and editing pages in Notion, adding text, lists, database entries, editing their properties and more. Maybe you even build frameworks and teach others how to use them.
Now, imagine if you could automate and simplify those repetitive tasks and do multiple things at once - literally with the click of a button?
Instead of painstakingly configuring third party automation tools, you can place buttons anywhere in your workspace to generate content, create pages, edit database entries and show confirmation dialogs.
Using buttons for request systems and complicated processes can streamline the workflow and save time for everyone - whether they’re new to Notion or a seasoned power user.
In this guide, we’ll explain how to create and configure buttons, and examples of ways you can use them.
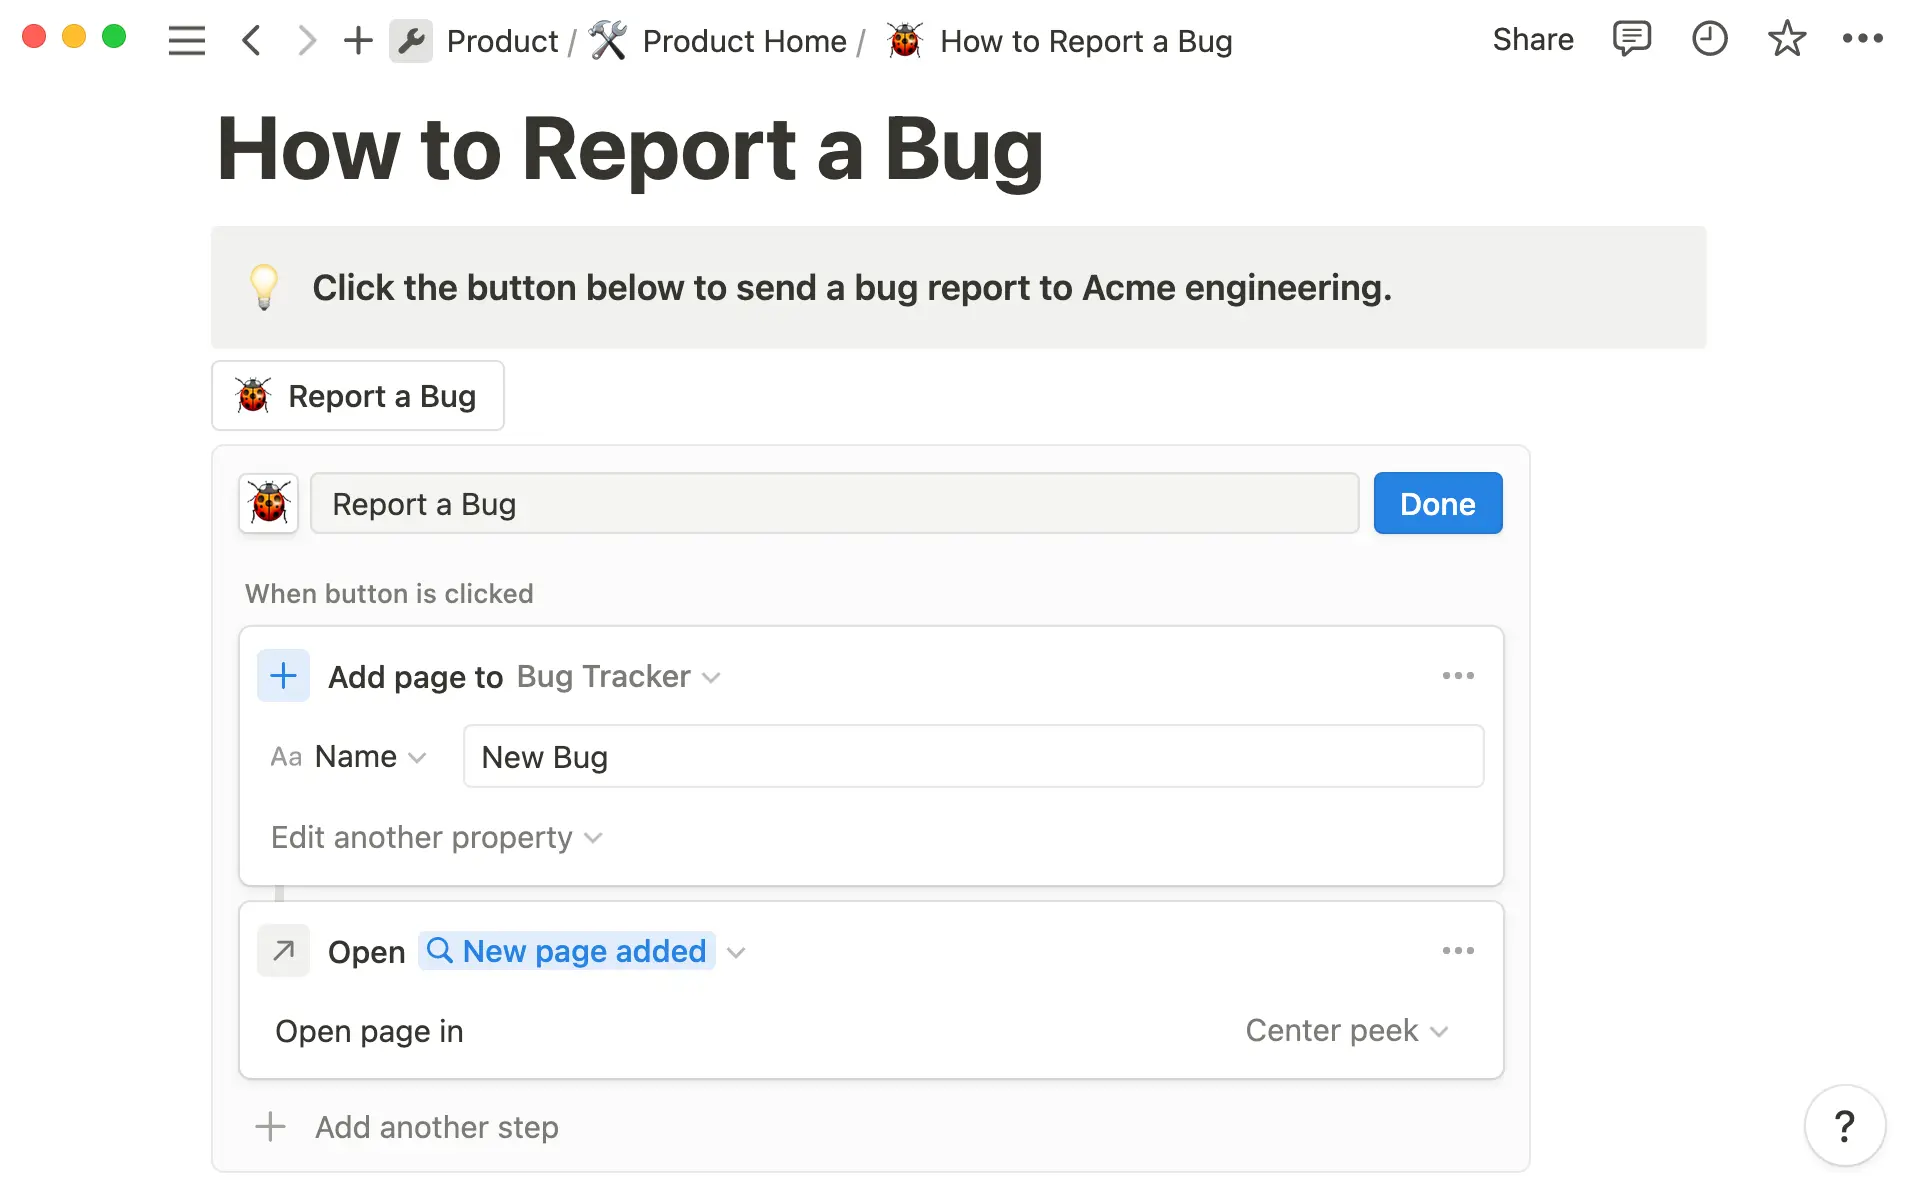
To create a button, open the / menu and select Button. This will open a configuration window where you’ll be prompted to choose what you want your button to do.
If you want to insert blocks into the page, choose Insert blocks and then start adding content in the box by hitting the / command and choose from text, lists, images, embeds, databases, and more.
Once you’ve added your blocks, click Done, and your button will appear on the page. Click it to reproduce those blocks whenever you need them.
Convenient, right? But there are many more things your button can do—including a combination of several actions.
If you want to change the button action or add more steps, go to the ⚙️ Configure icon next to the button, and either ... next to your current action, or + Add another step below.
Let’s take a more in-depth look at how each function works.
Insert any kind of blocks into your page
TheInsert blocks action will add content into the same page where you create the button. You can add as many blocks as you want, from simple toggles to full page templates, and pre-fill information your team needs for a recurring task.
This could help you
Spin up a checklist for your team — Insert a “To-do list” where the items will always be the same, such as a checklist for marking a feature spec document as complete, or handing over a project.
Write a content brief in minutes — Configure your button to outline an article, so you can generate instructions, prompts, headers, notes, writing guidelines, and even placeholder images. Then, all you have to do is customize and assign it to a team member to complete.
Develop your team wiki and workspace — Put a “Create new page” button so you can quickly add new pages to expand your knowledge base. You can pre-populate the page's required parts so it’s easy to complete.
You can use buttons to create new database entries and edit the properties of existing ones. This can help you streamline processes for newer Notion users and embed action steps in a document.
Database templates vs buttons
Your database templates let you create new items in a database based on a pre-designed format. With buttons, you can add or edit page properties in a database from anywhere in the workspace. Try using a button to create a page, and then a database template to populate the page's content.
Add a new database entry with a button
Let’s say you want to create an “Add new task” button in your department home, so you can quickly add action items to the team’s task database without leaving the page.
First, create a button and select Create page in a database in the editor. Next to Create page in, choose the database you want to add to - in this case, Tasks.
Next, go to the Edit a property dropdown where you can choose one or more properties to automatically fill out. Since this is a new task, you could automatically set the “Status” property to “To do” or “Not started”. You may also want to assign the task to someone by default, or set an arbitrary due date, such as “One week from today”.
You can use this to create new pages in any database, from your meeting notes and docs to your projects or client database.
Here are some other ways to use this button:
Report a bug to engineering team — Your Go-to-Market team can flag bugs or issues for engineering to look without going to the bug tracker database.
Add new product requirement document — Your product team can instantly start a new PRD with a button. Create an outline prompting you to complete the who, what and why of the product, and automatically tag product team.
Submit a design request — If your content team needs a new graphic for a blog post, they can send a request straight to the design team’s project database.
Create a company update — Whenever your People team need to send a company-wide update, the can create one with a button.
Edit properties in an existing database page
A button can help you simultaneously update properties for all pages in a database, or all those that meet certain criteria.
When you choose the Edit pages in database function, select the database you want to edit.
Then, you can use a filter to choose the types of entries you want to edit, then you can choose the property you want to assign them.
For example, you could:
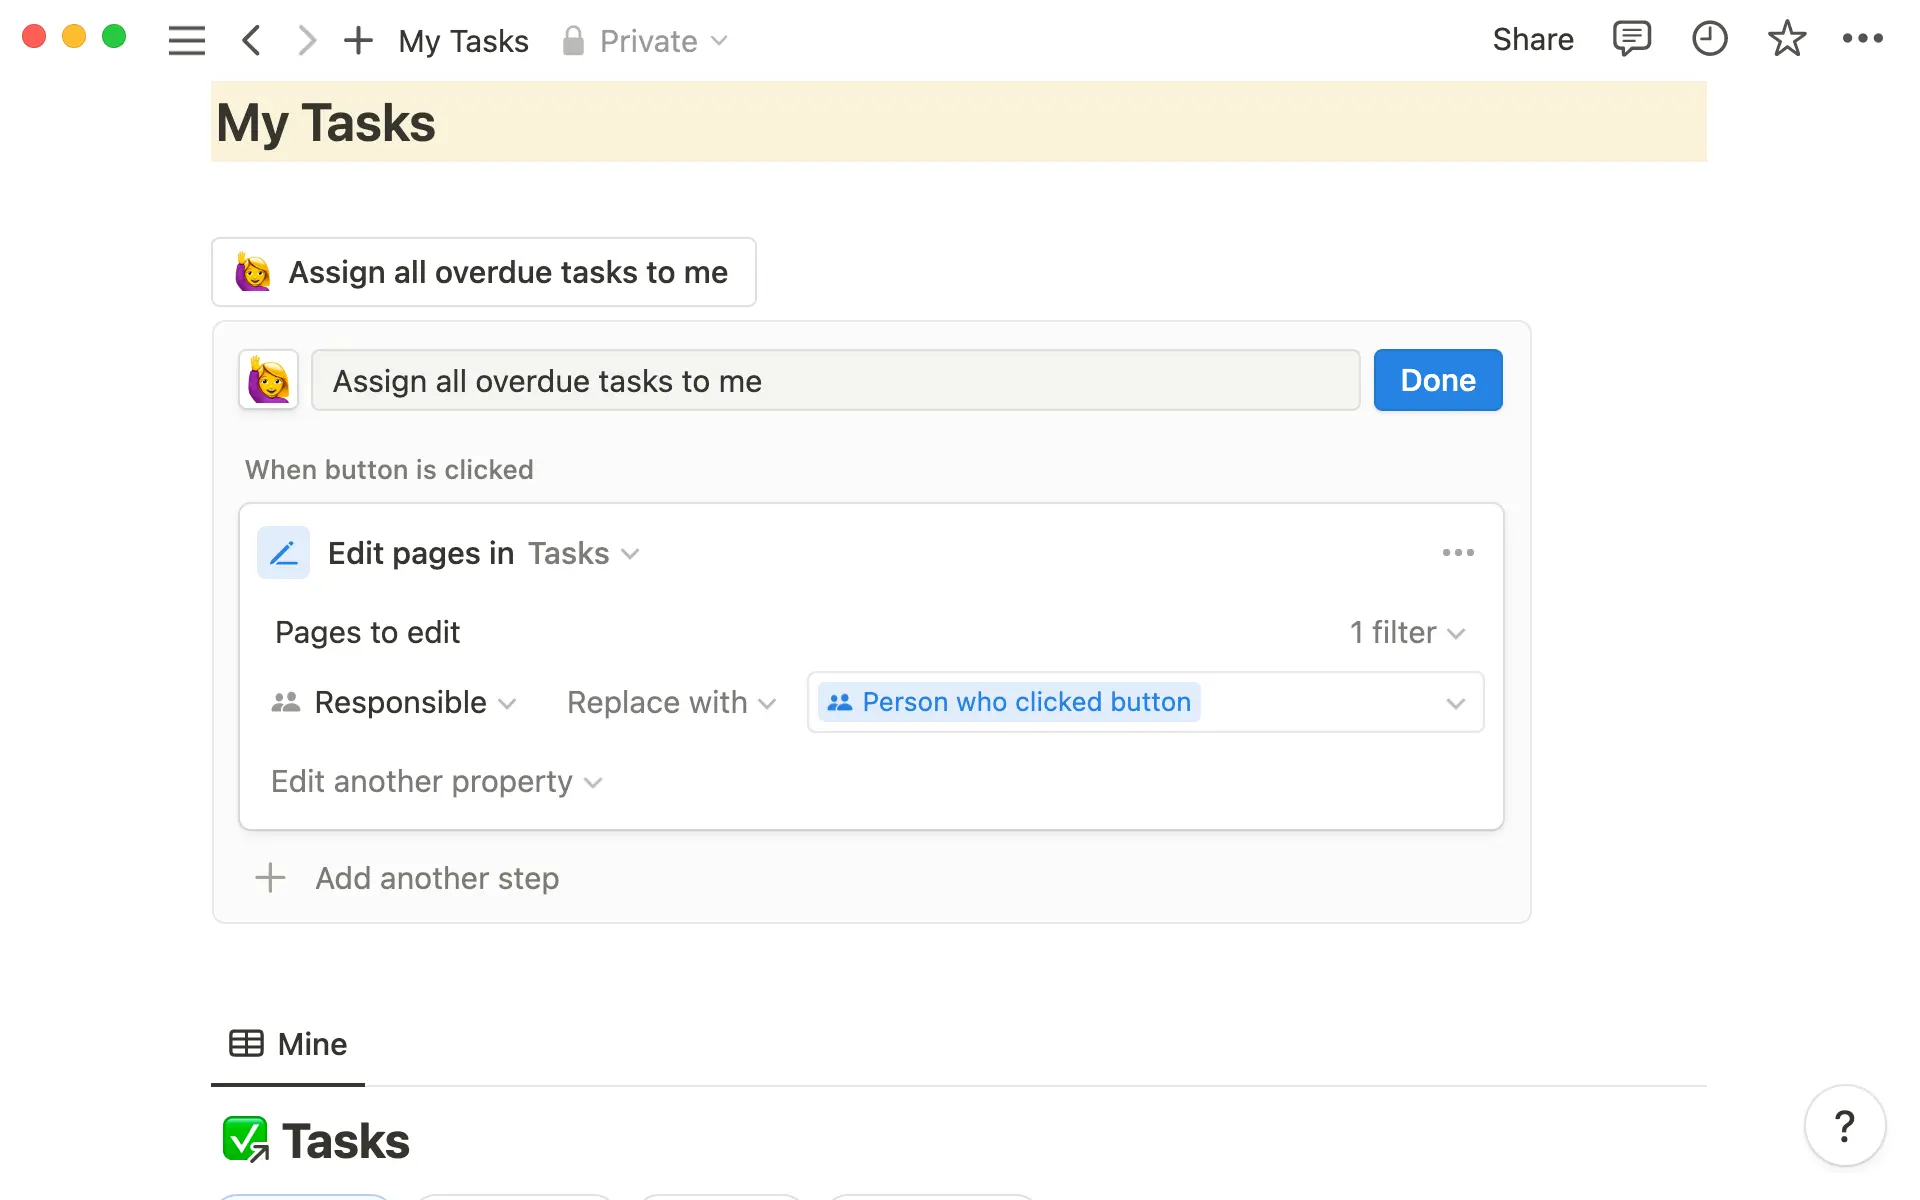
Make a button to assign all overdue tasks to you — Filter the database to show all tasks where the due date is on or before today. Then, choose the “Assign” property, and replace it with “Person who clicked the button”. This could also be useful for an engineer taking over triage of recently reported bugs.
More about person properties
"Person" is a dynamic property. When you select “Person who clicked the button” instead of your own name from the drop down, whoever clicks will be tagged. So, when someone clicks “Assign tasks to me”, they will be tagged.
Let teammates mark a document as “complete” — For a knowledge base article that’s required reading, you can add a person property called “Complete”. Then, add a button at the end where people can tag themselves.
Change the status of tasks — Your button can edit the “Status” property of a task, so you can easily move a task, or group of tasks, from “Up next” to “In progress”.
Open a page as a preview or in full
When you add “Open page” as an action step, another page will open when you click the button. This could be the page you’ve created in a previous step, or another page of your choosing.
So for example, if you’ve created the “Add new task” button mentioned previously, you could go to + Add another step and choose “Open page”. Then you can select Page created to go straight to the new task you’ve just created.
An “Add new page” button could also have a second step to open the page that’s just been created, so you can immediately jump in to editing.
You can decide whether you want to open as a full page, side peek or center peek.
Produce a pop-up confirmation window
Your button can generate a pop-up box offering two possible choices - to either continue or abandon the workflow.
This can be helpful for reinforcing process with your team members, and to ensure they are creating content intentionally.
For example, a pop-up could appear when someone attempts to assign tasks to themselves, saying “Are you sure you want to assign all outstanding tasks to you?”
Add confirmation dialog to your button
Open the button editor ⚙️. Click + Add another step and choose Show confirmation dialog. You can then edit the text you want to appear.
Buttons are a powerful automation tool and there’s no limit to how you can use them.
They can help you create new content based on templates, or edit all similar database entries with a click.
By making your team’s processes more efficient, you can scale your workflow and systems with ease.
Want more inspiration for how to use buttons in your workspace? Here are some more ideas:
Create a meeting agenda and notes — If you have a shared page for 1:1s with a team member, you can create a “New meeting” button inside that page. Place questions, prompts and bullet points that you use for the meeting in the “Insert blocks” module. When it’s time for the meeting just click the button and you’re ready to take notes.
Mark a document as finished — Use the Edit database properties action to mark the status of a document in your docs database as complete. You might add this button inside the document itself, to make it easy for your team members to update several properties at once - mark status as “Done” and fill out completed date as “Today.” You can even add another step to the button, which will create a new item in your tasks database for a manager to review the document.
Request multiple items with one button — You can make a button to request multiple actions once a project is launched. For example, by clicking the “Launch” button, you could add a post to the social media calendar, send a content request to the content calendar and change the project status to “In Progress”.
มีอะไรที่เรายังไม่ได้ทำไหม?